Hitting the bullseye: Adventures in computer vision # Hitting the bullseye:
Adventures in computer vision

July 19, 2017

## Intro Last week at work I was faced with the problem of accurately detecting the center of a circle in an image. A classic computer vision problem, but with some confounding issues: * The image can be noisy and blurry * The brightness of the dot and surroundings can vary * The circle can be partly obscured To my help I knew there was exactly one circle in the image, and I knew the radius of it. Some example images: ![](2017_07_19_hitting_the_bullseye/example_images.png) 
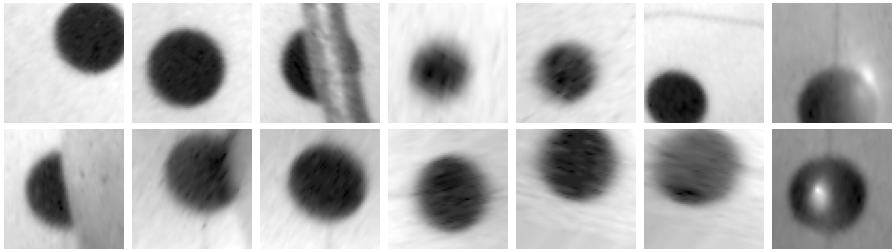
I ended up inventing a new circle detection algorithm which handles all the above issues and with robustness and accuracy. It can also be generalized to handle multiple circles of unknown radii. ## The algorithm Let's start off with the simple case of detecting the center of exactly one circle of a known radius, *R*. A few observations helps us: * The edge of the circle is always *R* pixels away from the center * The gradient of the edge is pointing towards the center of the circle * The gradient of the image is strongest at the circle edge Together this leads us to the algorithm: * Calculate the gradient of the image * For each pixel, follow the gradient *R* pixels (with subpixel accuracy) * Vote for this being the center of the image * The weight of the vote is proportional to the norm of the gradient * Use a robust, weighted centroid of the votes to get the circle center Simple, right? Let's go through these steps one by one: ## The gradient If one thinks of a grayscale image as a heightmap, then the gradient is the slope of the landscape. In this analogy, the edge of a dark circle on a bright background is like the inside of a crater rim: ![Arizona Meteor Crater. Photo by Shane Torgerson, via Wikimedia Commons](2017_07_19_hitting_the_bullseye/meteorcrater.jpg) 
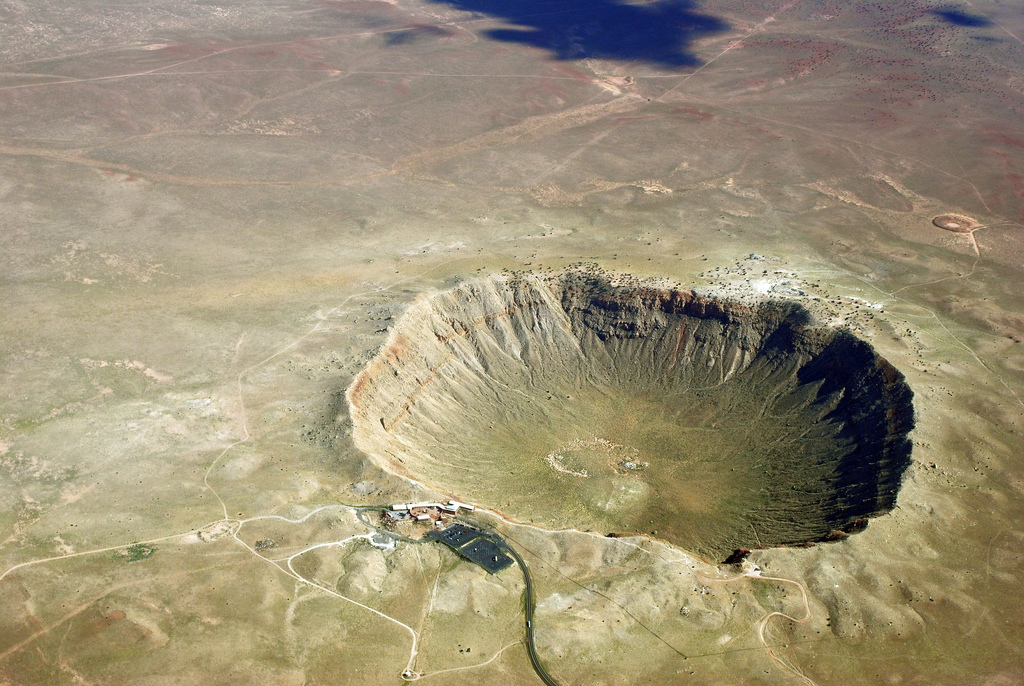
Now consider stumbling around in such a landscape blind-folded (don't try this). If you find a steep slope, it is likely the inside of the crater rim. If you follow the slope downhill, you are likely to find the crater center after walking *R* meters (where *R* is radius of the crater). If you find a gentle slope, it could be the part of the crater or just some small bump outside or inside it. In other words, a steep slope is more likely to be on the crater rim. This helps illustrate the weighting strategy in the algorithm: the stronger the gradient, the more likely it is the circle edge. You can calculate the image gradient using, for instance, a [Sobel filter](https://en.wikipedia.org/wiki/Sobel_operator). For my purposes, a kernel size of 5 worked well. Here is an example: ![](2017_07_19_hitting_the_bullseye/1_circle.png) ![A visualization of the gradient, where the brightness is the strength and the color is the direction of the gradient at that position.](2017_07_19_hitting_the_bullseye/2_gradient_colors.png) ![Another gradient visualization, as arrows pointing towards the brighter part.](2017_07_19_hitting_the_bullseye/3_gradient_arrows.png) ## 
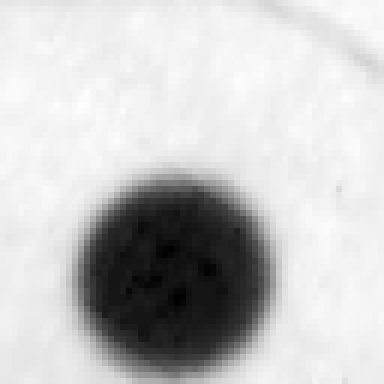
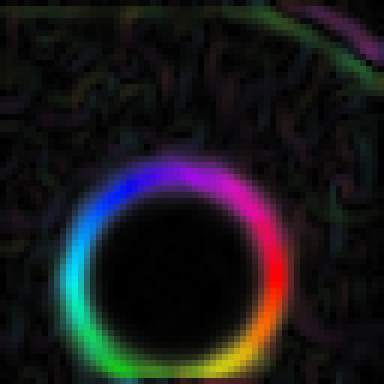
Collecting votes For each pixel in the image, calculate the gradient. If it is zero, ignore this pixel. If not, move R pixels along the gradient and save that position as a "vote" with a weight proportional to the norm of the gradient. Note that the position can be a fractional pixel, so don't snap it to integer coordinates! ![Some of the voting arrows (really there should be one per pixel). Notice how they are all the same length (R). Only their direction and strength/brightness differs. Notice how all the bright arrows come from the edge of the circle (where the gradient is strongest), and all point at the center of the circle (approximately).](2017_07_19_hitting_the_bullseye/4_vote_arrows.png) ![All the votes (where brightness = strength). Note how most votes is close to the center of the circle, but there is a large spread and also many outliers. In this example there are far fewer outliers than in some of the more extreme cases that this algorithm can handle.](2017_07_19_hitting_the_bullseye/5_votes.png) ## 
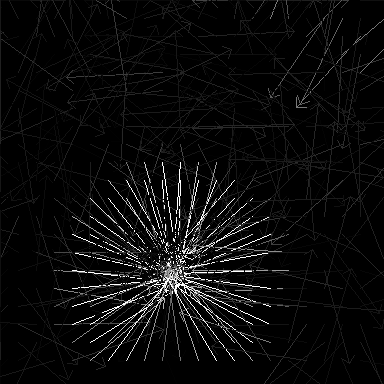
Tallying votes Most strong votes will come from the actual circle edge, but there will also be quite a few bad votes from noisy parts of the image. Thus, we don't want to simply take the average of all the votes, nor even a weighted average. Instead, we want to take a [*robust*](https://en.wikipedia.org/wiki/Robust_regression) weighted average – i.e. we find an average that ignores outliers. There are many ways you can accomplish this, but a very simple yet effective strategy is [trimming](https://en.wikipedia.org/wiki/Least_trimmed_squares). This means we find a starting guess for the circle center and then we iteratively compute a new center using only the points within a certain distance to our current center. But what should be the starting guess? The guess must be close enough to the circle center, or the trimming iterations won't converge. I opted for a very simple strategy: bucketing. I divide the image into coarse buckets, and collect weighted votes in each bucket. The bucket with most votes is used as a starting guess. Here is the whole process, from votes to the final circle center: ![Showing: votes, bucketing, the iterative trimmed average (only using votes within the shown circle), and finally the output.](2017_07_19_hitting_the_bullseye/6_votes_gif.gif) ## Pseudo-code ~~~ # Find the center of a circle with radius *R*: function circle_center(image, R) -> Point: let gradient = calc_gradient(image, KERNEL_SIZE) var votes = vector<Point>::new() var weights = vector::new() foreach (x,y) as point: g = gradient(point) if norm(g) != 0: # Note: the sign here depends on if you have a # dark image on a bright background or the other way around. # If you don't know, you can vote in both directions. votes.append( point + R * g / g.norm() ) weights.append( norm(g) ) let buckets = put_votes_in_coarse_bucket_grid(votes, weights, BUCKET_SIZE) let start_guess = largest_bucket(buckets) return trimmed_weighted_average(votes, weights, start_guess, TRIM_RADIUS) ~~~ ## Results ![](2017_07_19_hitting_the_bullseye/result_images.png) ![A complicated example, from start to finish.](2017_07_19_hitting_the_bullseye/full.gif) ## Extending the algorithm to unknown radius If we do not know the radius beforehand, we need an algorithm looking for three numbers: *x, y, r* (circle center and radius). This means we now have a three-dimensional solution space. We can extend the algorithm by not voting with 2D points but with 3D rays. These rays start at an edge, moving in the direction of the gradient and along the third dimension: the radius. Thus for each pixel, we vote with a ray which starts at the pixel and moves along (*dx, dy, 1*) where *dx/dy* is the gradient of the image at that pixel. The vote weight is the gradient norm (*√(dx² + dy²)*) like before. The solution is the point which is closest to the rays – this will be some three-dimensional point where the first two coordinates are the *x/y* circle center (like before), while the third coordinate is the radius of the circle. This is most easily illustrated with a one-dimensional circle (a row of darker pixels): ![The big pixels at the bottom is the input 1D-image, where the dark pixels in the middle illustrates a circle and the bright pixels on the sides is outside the circle. The line above is a heightmap illustrating the gradient. The arrows always point in the direction `[+1, +1]` or `[-1, +1]`, depending on the direction of the gradient. The strength of the arrow depends on the strength of the gradient (in this case, stronger = darker). The solution can be read out along the red lines: the vertical pointing towards the center of the circle (center of the black), and the horizontal pointing out the radius of the solution. Sorry for the programmer art.](2017_07_19_hitting_the_bullseye/ray_unknown_radius.png) As before we want a robust intersection of the rays (ignoring outliers), weighted by the vote strengths. For a starting guess you can collect the votes in a coarse 3D grid by rasterizing the rays with e.g. [Bresenham's line drawing algorithm](https://en.wikipedia.org/wiki/Bresenham%27s_line_algorithm) (a 3D version of it). You can then use [this method](https://en.wikipedia.org/wiki/Line%E2%80%93line_intersection#Nearest_point_to_non-intersecting_lines) to find the point which minimizes the distance to all the rays within the trimming radius. Repeat a few times, and you have a robust estimation of the circle center and the radius. ## Extending the algorithm to multiple circles Instead of picking a single bucket as the starting guess for the circle center we can pick all buckets over some threshold. This will allow us to find many circles. Two neighboring buckets may converge to the same circle center, so you will need to cull duplicates after refinement. ## Closing thoughts Well educated readers will notice that the algorithm I have described bear some similarities with the [Hough transform](https://en.wikipedia.org/wiki/Hough_transform) (a method I only learned about after coming up with everything above). One difference is that my method uses the gradient direction to constrain where to vote. This improves the quality of the result and also the runtime. Another difference is that the Hough transform _only_ uses bucketing without the subpixel refinement of my method. This makes the Hough transform very sensitive to the bucket size – too large and it yields bad precision; too small and it will no longer be robust to noise. The method described in this article gets subpixel precision while handling noise. By using image gradients and robust weighted averaging, we can get robust circle center estimation with very high accuracy.